Navigating your Site

Entering Video Blocks in Squarespace

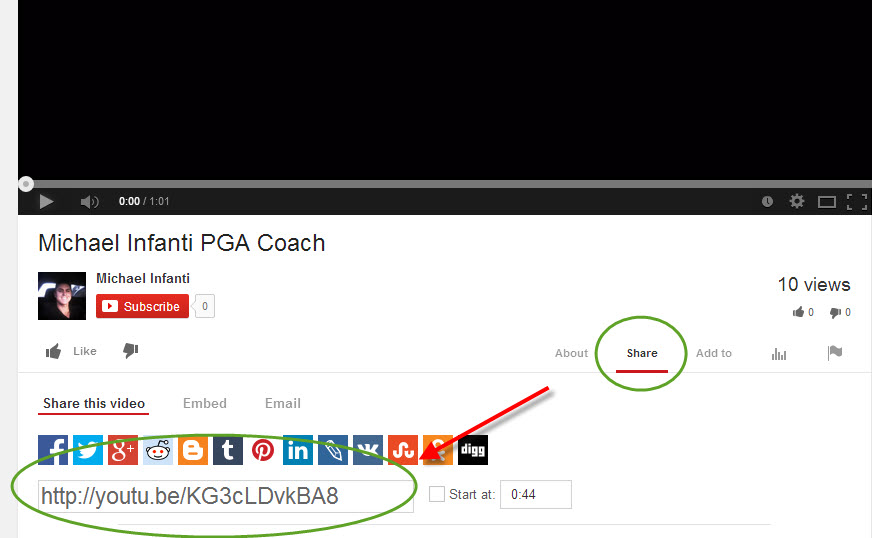
Entering a Video Block is similar to entering an Image Block. First Login and select the desired page in your Navigation Menu. You cannot upload video directly in Squarespace, you must do via a third party provider such as Youtube or Vimeo. Select the desired Video and in this case using Youtube click on Share then copy the URL link that comes up.

Click on the Black dot to bring up the content block

Click on the Video link

In the Pop Up enter the URL you copied from Youtube. The image that appears on your website will be the same as that of the image in Youtube. If you want to replace it use Custom Overlay and enter a new image. You can also decide to put a caption or not. The description that comes up will be the one from Youtube, you can change for SEO purposes. Click Save.

You can now manipulate the image size and position the same as an image as per this posting

Entering Imaging blocks in Squarespace

To enter a new image block first Login and select the page and area you would like the image block to appear. When you move your cursor around you will see these little black dots appear (as highlighted in green). 

Click one of these dots and a Content Block will appear. This block contains lots of options such as a Text, Quote or for this example click on Image

Click on the arrow in the white box and search your computer for the desired image then press save.

Details on the functions of Editing the image, Stretch and clickthrough URL can be found . If you would like to move the image Click and Hold on the image and then drag to where you want it to appear. You can put it inside a text box (text will wraparound) or outside a text block and the text will form a column next to image. See the 2 images below.

You can also use the Spacer function in the Content block (click on black dot to call up Content Block), click on Spacer and then you can move it next to the image, you can expand or shorten and image will enlarge or get smaller. You can put a spacer either side of the image to centre the image if desired.

Experiment with the Content Block to see the available functions, use a test page and put it in your Not Linked section in your Navigation menu.

Editing images using the image block in Squarespace

To edit or change an image in an Existing image block on your Squarespace website please first Login to your Squarespace account, select the page and then double click on the image you would like to edit..

In this example we will be changing this lighthouse image.

The Edit box appears. Note the circle in the middle of the image. That can be moved around to change the focus of the image. If the image needs to be re-sized such as on a mobile device it will maintain the focused area and drop of the areas around it.

To change the image click on the Garbage Bin icon and the image will be removed.

Once the old image has been removed click on the Arrow and then locate the new image you want to use on your computer, when located double click on the image to upload.

Your new image will now upload. You can use the circle to re-focus. You can also chose to add a Caption Below or Overlay (On top of Image) or Hover Overlay or No Caption. For SEO purposes it is best to add a file name which relates to the image and your business. If you select Stretch it will stretch the image to fit the size of container you have placed it in.  Lightbox will enlarge the image in a pop up when someone clicks on it. The clickthrough URL will take someone to either a page on your website or external page (you can chose) upon someone clicking on the image. 

If you click on the Crayon (next to the Garbage Bin icon) you can edit the image. Functions such as cropping, adding text etc. Click the cross to exit or save if changes made.

Iamge 5.jpg

Click save and you new image should appear in your webpage.

Connecting your Social Media in Squarespace

Setting up Social Media

Connecting your social media in Squarespace could not be easier.

Step 1

Simply login to your Squarespace account and in the main menu on the left select the Cog icon.


Step 2

Select the Connected Accounts 

Connecting Social Media

Step 3

Add Social Media Account Selection

Select Add Account button and in the pop up that appears select the Social Media account you want to add. You will then be asked for the Username and password for the relevant account, enter those and follow any additional instructions and you are done. To add another account simply select Add Account again from the Connected Account section.


Step 4

Linking Facebook

Often you may be the administrator of several different pages within your social media account. In Facebook for example click on the Facebook Connected Account you just setup and the following box will appear. Click on the Push Target and a list of each of the pages you manage will come up. Select the one that is applicable. If you also select impersonate page then when you post from your Blog to your Facebook it will post as that page.